Windows 10 have a preinstalled application to record audio. By this, you can record audio using the inbuilt microphone or by connecting an external microphone.
Besides this, you can record audio using some third-party applications, which will give more control over the recording.
In this guide, you will learn to record audio on Windows 10, record internal audio(audio from any application running on the computer), record audio without a microphone.
Record audio using the Voice Recorder app
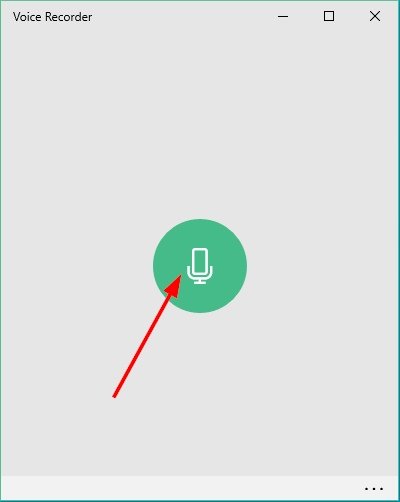
STEP 1: Open the Voice Recorder app. You will find this on the list of programs at the Windows Start menu. Or, you can just search for Voice Recorder on the Windows search bar.

STEP 2: On the starting window of the Voice Recorder app you will get the option to record audio. When you will click on the Record button it will start capturing the audio from the microphone.
Make sure the microphone is connected properly and the Voice Recorder app has access to the microphone.
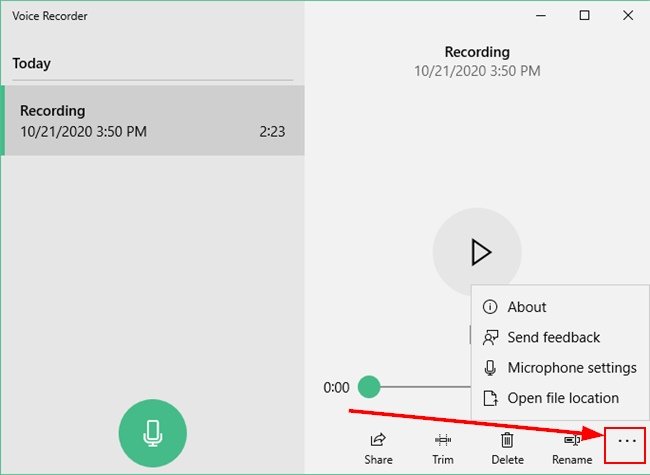
To check the microphone access to Voice Recorder click on the three dots at the bottom of the Voice Recorder app and select Microphone Settings.
It will open the Microphone settings window where you can check for all the app granted access to the microphone. Make sure the Voice Recorder app has the microphone access enabled.

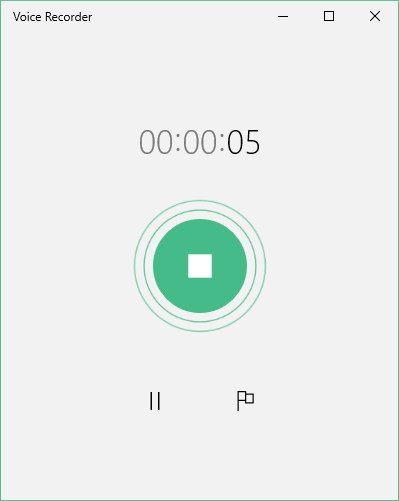
STEP 3: When you will start the audio recording you can see the recording button changed to the Stop button. This button will stop the audio recording.
To take a break while the recording is on you can use the pause button on the screen, it will just temporarily pause the recording and you continue from this point by clicking on the same button.
When you will stop the audio recording it will be saved on your computer. And you will also get options to trim, share, and rename the audio. Let’s have a look at these options.
How to trim the recorded audio?
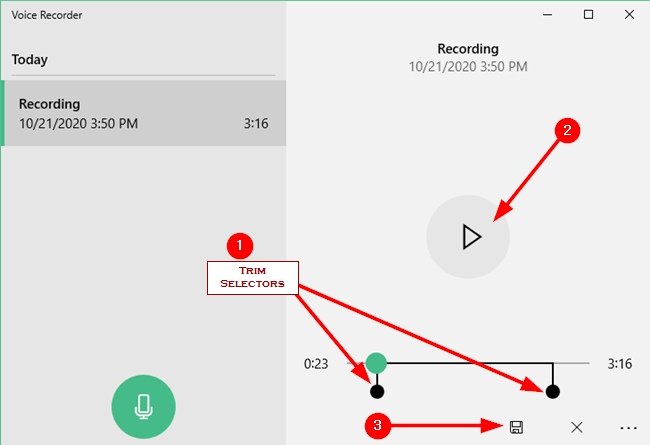
Select the audio you want to trim(in case you have recorded more than one). You will get the trim button at the bottom of the screen, click on that button.

You will see selectors for trimming the recorded audio.
Set these selectors according to the position you want to trim.
Now, play the selected audio to make sure you selected the right portion of the audio. If it did not position correctly you can reposition the selectors again on the proper position.
Finally, click on the Save button to save the audio. You will get two different options to save the audio. One will save the new trimmed version separately and another will overwrite on the original recording.
How to rename recorded audio?
To rename a recorded audio click on the Rename option on the bottom of the screen. Now it will ask you to enter a new name for the audio. Type a new filename and click on the Rename button.

How to share the recorded audio?
You can share the recorded audio from the Voice Recorder app by clicking on the Share button. It will give the sharing options available on your computer.
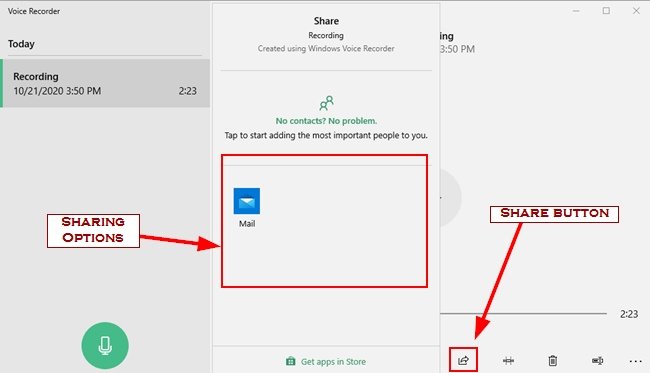
You can also share the recorded audio on different methods you want. For that, you need to locate the recorded audio on your computer. All the recordings save on the Sound Recordings folder under Documents.
If you do not find the recorded audios on that folder you need to locate it manually.
To locate the recording click on the three dots at the bottom right corner of the window and select Open file location, it will open that folder.
SEE ALSO:
- 3 Easy Methods to Show Hidden Files in Windows 10.
- How to disable startup programs?
- Must have software on Windows 10.
How to record internal audio on Windows 10?
You can record the Internal audio using the Audacity software. This software has some good controls on the recording. You can record any audio that is coming out from your computer.
- Download the Audacity software from the official website. This software is available for free, also available for Mac and Linux computers.
After downloading it according to your Operating System install it. - On the Audacity window select Windows WASAPI as the audio host and select any loopback device available on the Recording Device.
- Now, click on the Record button to start recording Internal audio of the computer.

- To save the recording when your recording is complete go to the File menu and select the Export option. From here you can save the file in the available formats.

How to record audio on pc without microphone?
You can record audio on your PC even the PC does not have a microphone. For this, you need an Android phone. You can use your Android phone as a microphone and webcam for your computer.
You need to download the DroidCam android app on your phone and the DroidCam client on your computer.
Now you can connect your phone using USB or Wi-Fi to the DroidCam Windows client and use it as a microphone or/and webcam. See this step-by-step tutorial to use DroidCam as a microphone and webcam.
Recommended: Microphone for PC available on Amazon
If you need to purchase a microphone for your computer you can check the microphone listed here. These are some popular and best-performing microphone compatible with PC.
Having passed the long way from a database analyst and computer technician to an executive in charge of a large enterprise department's technical direction, he now uses his experience and the almighty power of the Internet to teach, inspire and empower young people and mature to extend their technological skills.
- Convert Multiple Images to Text using OCR using Python - November 10, 2023
- How to use WhatsApp on Android Tablet (Simultaneously) - September 1, 2022
- How to Cancel PayPal Subscriptions (recurring payments through PayPal)? - June 28, 2022

