Windows has its built-in features to take screenshots which are pretty good. Though to take a screenshot on windows you can use some free third-party applications.
Check below to find different ways to take screenshot on windows.
Take screenshot on windows with default Print-Screen method:
You can use the ‘Print Screen’ method in two different ways. One will auto-save the picture after taking a screenshot and for the other, you have to paste it to Paint or any image editor. Let’s check one by one.
Take Screenshot on windows with autosave:
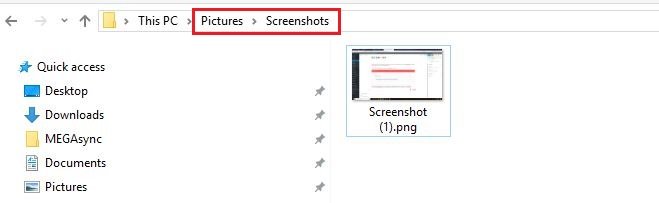
Press Windows Key + Print Screentogether, it will automatically save the screenshot. Now open your Pictures folder, you can see a folder created with named ‘Screenshots‘. Open the folder and you can find the screenshot you just have taken.
Take Screenshot on windows without autosave:
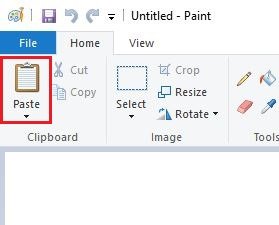
Press the Print Screen key on your keyboard, it will take the screenshot. Now open Paint and press Ctrl + V together to paste the screenshot on paint or you can click on the paste button. You can now see the image has been pasted on paint, now save the image in whatever format you want.
Take Screenshot on windows of a specific window:
You can take a screenshot of a specific window only. Highlight the window of which you want to take the screenshot. Now press Alt + Print Screen key together to take the screenshot. Now open Paint and press Ctrl + V together to paste the screenshot of the specific window on paint or you can click on the paste button. You can now see the image has been pasted on paint, now save the image in whatever format you want.
Use the Snipping Tool to take screenshot:
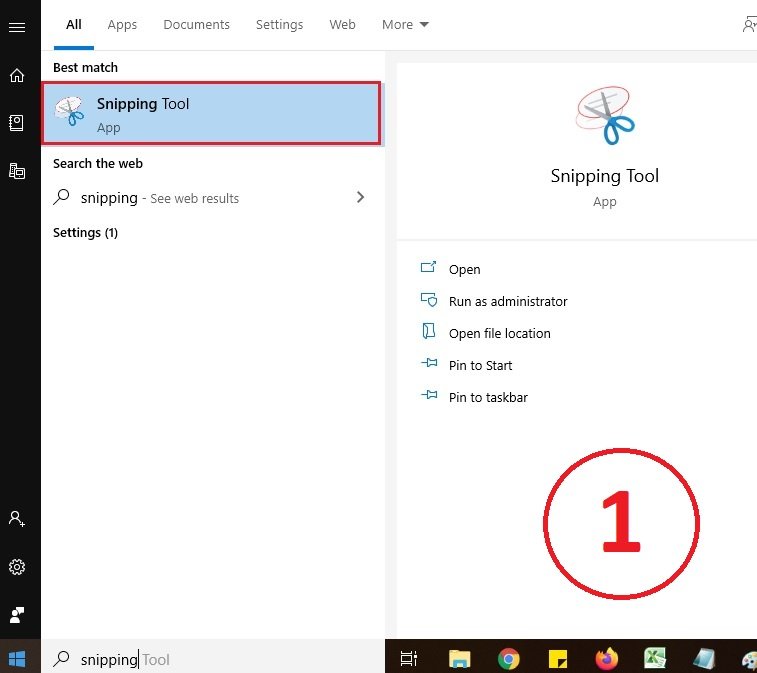
Go to Start menu and search for Snipping Tool, open the Snipping Tool. Click on New on the Snipping Tool window.
The whole screen will be blurred. Now drag the portion of which you want to take the screenshot. When you will release the pointer the screenshot will open on the Snipping Tool window. Now save the screenshot on your computer.

Using Lightshot (third-party application):
You can find many third-party tools to take screenshot on windows. You can check the Lightshot screenshot tool. The tool has many features. You can edit the screenshot before saving the image. You can share directly with someone without saving the image. When you will click the share button it will create a link, you just need to share the link. And it also works for Mac.
- Download the Lightshot software from this link.
- Now install the software.
- Now when you will press the Print Screen button, the button will work for Lightshot. You can also use the application by clicking the icon on the notification area.
- Drag the portion of the window you want to take a screenshot.
- You can now see the different options available under it. Share it to social media, you also can get a sharing link, edit the image with different options.
You can check the tool if you need to edit the screenshots before using it anywhere.
Also, check “How to Screenshot on Mac?”
Having passed the long way from a database analyst and computer technician to an executive in charge of a large enterprise department's technical direction, he now uses his experience and the almighty power of the Internet to teach, inspire and empower young people and mature to extend their technological skills.
- Convert Multiple Images to Text using OCR using Python - November 10, 2023
- How to use WhatsApp on Android Tablet (Simultaneously) - September 1, 2022
- How to Cancel PayPal Subscriptions (recurring payments through PayPal)? - June 28, 2022

