All versions of Windows keep some files and folders hidden to protect these, so no user can edit or delete the files. You can also hide any folder or files for security, though this is not the best way to protect files/folders.
If you want to see the hidden files/folders that were hidden by the Windows system or by you then you can follow any of the methods explained below.
Show Hidden Files in Windows 10 from File Explorer
You can show the hidden files on Windows 10 from File Explorer. You can do this on any File Explorer window. Let’s see the step-by-step process…
METHOD: 1
- Open any Folder(File Explorer) in your Windows 10 computer.
- Under the View menu, you can the option Hidden items, tick the check-box.

Now all the Hidden files on the computer will be shown, no matter in which folder the files are located. You can check this by opening the different folders.
METHOD: 2
There is another method to show hidden files in Windows 10 from File Explorer, and it is also from the View menu.
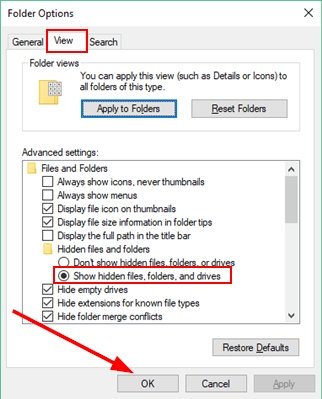
- Under the View menu click on the Options button.

- On the Folder Options window go to the View tab.
There you need to check the Show hidden files, folders, and drives.
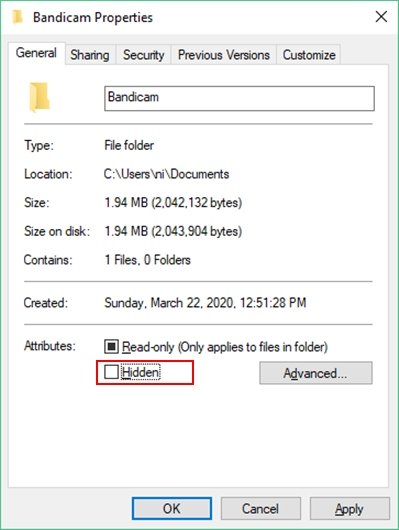
If you want a hidden file/folder to be shown as the normal files on the computer even if the hidden option is turned on, then you need to unmark the hidden attribute from its Properties.
SEE ALSO:
- How to Record Audio on Windows 10?
- How to Find Wi-Fi Password on Windows 10?
- How to Uninstall Internet Explorer on Windows 10?
Show Hidden Files in Windows 10 from Registry Editor
You can also show the hidden files in your Windows 10 computer using the Registry Editor. This process is little geeky. Do not mess with the other values on the Registry Editor other than the steps shown below, otherwise it might damage your Windows 10 system.
- Open the Registry Editor. Search for “regedit” on programs, or type “regedit” on Run and open it.

- On the Registry Editor window navigate to:
>HKEY_CURRENT_USER
>Software
>Microsoft
>Windows
>CurrentVersion
>Explorer
>Advanced
Under the Advanced folder open the Hidden attribute from the right-side panel. On the Value data field type 1 to show the hidden files. If you put 2 on the Value data then the files will be hidden.

After entering you desired value to show/hide the files, folders, and drives click on the OK button and close the Registry Editor window. Now check on the folders to see the hidden files and folders.
Show Hidden Files in Windows 10 in Command Prompt
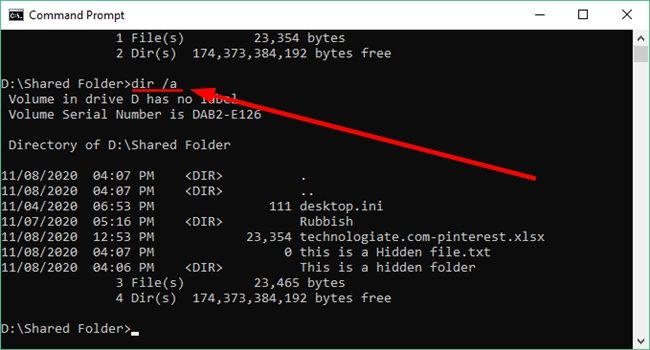
Normally when you put the dir command on Command Prompt it lists all the files and directories under the folder it is currently in. But it does not lists the hidden files or folders.

To display all the hidden files and folders in Command Prompt use command dir /a.
Show Hidden Files on External Drive affected by virus using CMD
When you want to show the hidden files/folders on a external drive/USB that is affected by virus, you need to type the following command on a Command Prompt opened with Administrator privilege. See the step-by-step process…
- Open Command Prompt with Administrator privilege.

- Type the command
attrib -h -r -s /s /d E:*.*and press the Enter button. Replace E with the drive letter assign to the external drive by you computer.
It show all the hidden files and folders on the external drive those are affected by some virus.
Having passed the long way from a database analyst and computer technician to an executive in charge of a large enterprise department's technical direction, he now uses his experience and the almighty power of the Internet to teach, inspire and empower young people and mature to extend their technological skills.
- Convert Multiple Images to Text using OCR using Python - November 10, 2023
- How to use WhatsApp on Android Tablet (Simultaneously) - September 1, 2022
- How to Cancel PayPal Subscriptions (recurring payments through PayPal)? - June 28, 2022


