DNS(Domain Name System) plays a vast role to show you the web-pages you on the browsers. What it actually does? Well, you already know that all the websites(domain names) are mapped with IP addresses. When you type a domain name on the address bar the DNS looks for the IP address for the domain name. This results to serve the web-page on your browser.
Should you change DNS on Windows 10?
If your ISP(Internet Service Provider) using a slow DNS provider(high response time) and it is causing a slow Internet connection to you then you must change it to a DNS with a low response time.
Some popular & FREE DNS Servers
There are many FREE DNS servers that you can use to speed up your Internet connection.
1 | Google public DNS servers
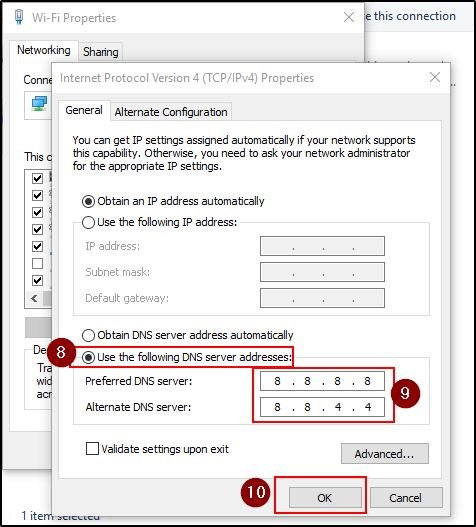
- Primary DNS server: 8.8.8.8
- Secondary DNS server: 8.8.4.4
2 | Cloudflare DNS servers
- Primary DNS server: 1.1.1.1
- Secondary DNS server: 1.0.0.1
3 | Verisign public DNS Servers
- Primary DNS server: 64.6.64.6
- Secondary DNS server: 64.6.65.6
You can find more FREE public DNS servers here.
How to change DNS on Windows 10?
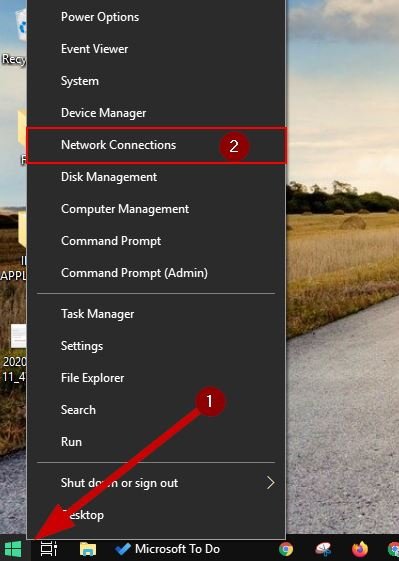
- Right-click on the start menu.
- Click on Network Connections.
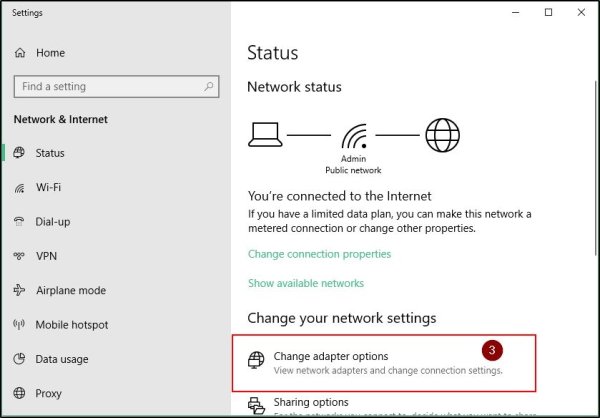
- Click on Change adapter options.
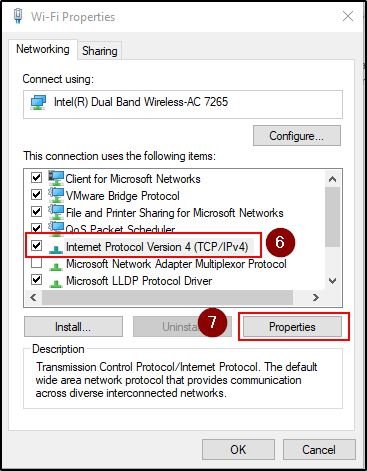
- Now you can see all the network adapters available on your computer. Right-click on the network adapter which is connected to the network.
- Click on Properties.

- Select Internet Protocol Version 4 (TCP/IPv4).
- Click on Properties.
- Select Use the following DNS server addresses.
- Enter new DNS server addresses on the preferred and alternate DNS server field (Primary & Secondary DNS server accordingly).
- Click on the OK button.
That is all. You successfully changed the DNS on your Windows 10 computer.
Having passed the long way from a database analyst and computer technician to an executive in charge of a large enterprise department's technical direction, he now uses his experience and the almighty power of the Internet to teach, inspire and empower young people and mature to extend their technological skills.
- Convert Multiple Images to Text using OCR using Python - November 10, 2023
- How to use WhatsApp on Android Tablet (Simultaneously) - September 1, 2022
- How to Cancel PayPal Subscriptions (recurring payments through PayPal)? - June 28, 2022

