This Cloudflare WordPress setup guide is covered with the basic and some additional settings to make any website secure with faster-loading speed.
Cloudflare is a popular CDN(Content Delivery Network), it serves the static contents of the websites from its distributed servers located around the world.
In this guide, I have discussed full set-up for security and optimization on Cloudflare.
How does Cloudflare Works?
Your hosting server may be located in any location. Imagine the hosting server is located in New York. One user from Tokyo sent a request to view the content. Then he/she needs to wait till the contents load from the New York server. But if the content can be served from the user’s nearest location then the loading time will decrease automatically. This job can be done by Cloudflare with its large CDN network located around the world.
Click here to see the Cloudflare Data Center Map.
Cloudflare also protects websites from attacks by its firewall. You will get additional security for websites from cloudflare.
You can set up cloudflare for WordPress website or for any websites that are not on WordPress. It provides free services as well as it has some premium plans with some additional functionality.
You need to create an account on Cloudflare before continue. Cloudflare Sign Up link.
Adding a website to Cloudflare
If your host is already providing the Cloudflare service then skip this and go to the Page Rule Set up on Cloudflare.
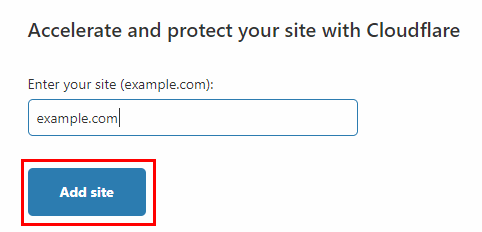
After the sign-up process completes go to Add Site, it will ask you for your website. Enter your website and click on the Add site button.
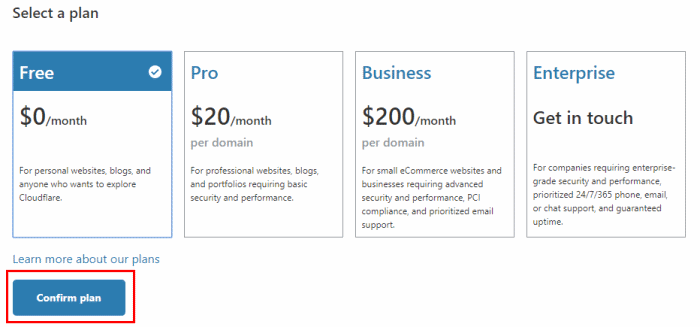
Choose the Free plan and Confirm it.
Then it will scan for the DNS records of the website from the domain provider and show you the list of the DNS records. Click on the Continue button at the bottom to set-up further.
Now you need to change the nameservers for the domain. It will show you the current nameservers which you need to replace with the Cloudflare’s nameservers.

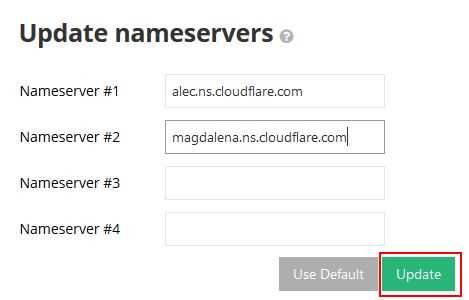
Now go to your domain nameserver settings and you can see there these name servers. Replace these with Cloudflare’s nameservers you found on the Cloudflare page.
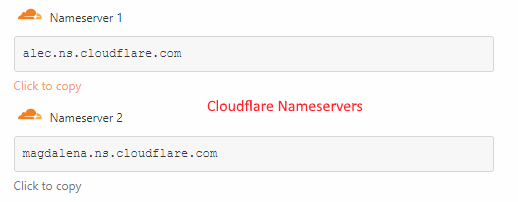
Copy the nameservers from Cloudflare and replace these with the existing nameservers you found on the nameserver page.
I am using Hostinger as my domain and hosting provider. Your nameserver page may be slightly different from the image below. After that click on the update button to update the nameservers.
Now go to the Cloudflare page and click on the Done, check nameservers button. It will now check for the nameservers updated or not. If everything goes perfect it will ask you to do some basic settings for security and optimization.
You can set these basic settings later, but these are Cloudflare recommended settings. So it is wiser to set these on this screen.
Set-up SSL/TLS encryption mode
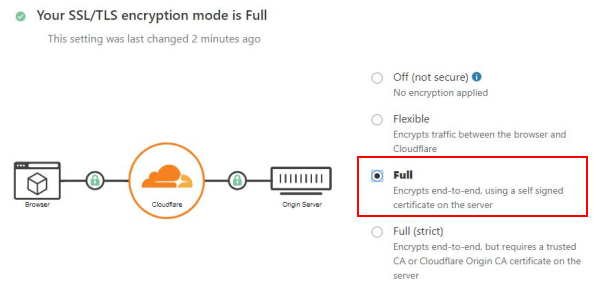
If you already have installed an SSL Certificate for the website, it will add additional encryption to the website.
If you do not have an SSL certificate installed or if your SSL Certificate has been expired you can easily get a Free SSL certificate from Letsencrypt using this guide.
You can choose the encryption mode which you want. Full is the recommended mode for security and performance(loading speed). If you choose No encryption here, then only the installed SSL will work, no Cloudflare encryption will work for the site.
Always Use HTTPS by Cloudflare
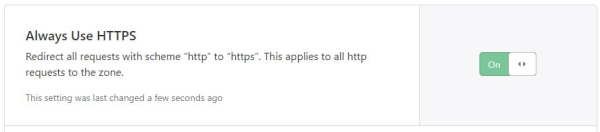
Turn the Always Use HTTPS on to force HTTPS everywhere. What it does that when someone visits the website by only the HTTP like http://www.example.com, then Cloudflare will force the connection to HTTPS and the website will load with this https://www.example.com. So each time the website will load with the SSL encryption. It will increase the security of the website.
Set-up auto minify by Cloudflare
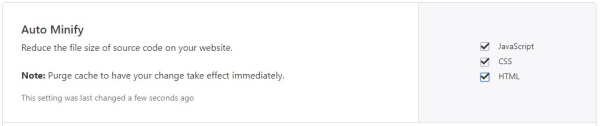
After enabling this for javascript, CSS, and HTML cloudflare will minify these files by removing the unnecessary characters from these files. It will increase the loading speed of the website. Also, it is a basic recommendation by Cloudflare.
After all the settings click on Done to save the settings. The website is now set up with basic Optimization and security by cloudflare. Now you need to make some additional set up to optimize more security and performance.
Set up Page Rules on Cloudflare CDN

You can set up some custom page rules for your website to optimize more. For a free plan, you can apply only three Page Rules. Follow these page rule settings to optimize for the best out of these Free Page rules.
Click on the Create Page Rule Button. You have to add the first rule here.
Page Rule for the front end

Enter your site name with the asterisk before and after the domain name as on the image above. This will apply the settings for all the subdomains and all the URLs of the website.
- Browser Cache TTL: Set it for a day. What it does it caches specific static assets to the visitors’ browser to provide a fast experience for the visitors. You can read more about it here.
- Cache Level: Set it to Cache Everything to cache all the static content for the website.
- Always Online: Turn this on to always put your site always online. If your host stays unreachable for some reason, then Cloudflare will serve the cached version of the website to the visitors.
- Rocket Loader: This is optional settings, you can set this to optimize loading speed. It defers the Javascripts files and loads the other static contents first. Deferring Javascripts will decrease the load speed because the Javascript will load after the other static contents. You read more about this here.
After all the settings click on the Save and Deploy button. The settings will be saved and applied to the website.
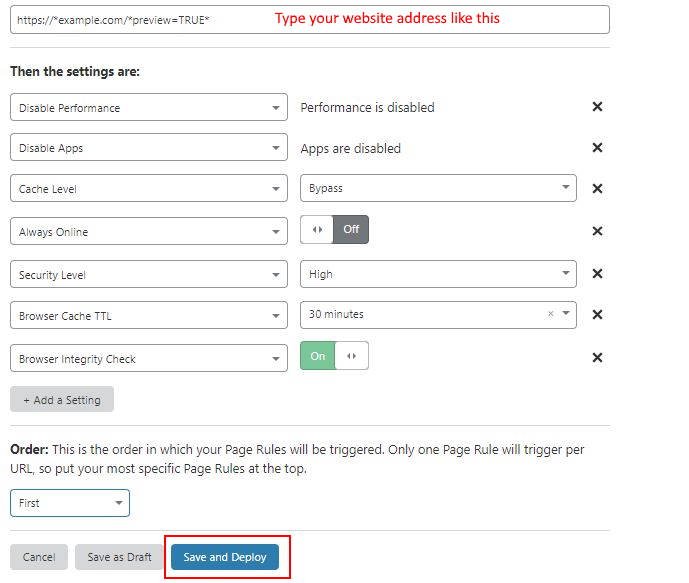
Page Rule for the Admin Dashboard
Now create another page rule for the admin page. You need different settings for the admin page. Create another page rule.
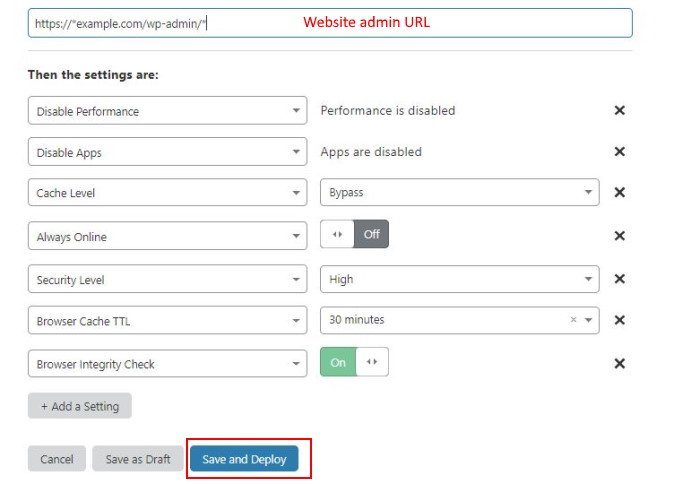
Enter the admin dashboard address as on the image above and do not forget to put the asterisks before and after. And add the settings.
- Disable Performance: It will disable the Cloudflare performance for the admin dashboard. Actually you do not need it for the admin dashboard.
- Disable Apps: It will disable all the apps from Cloudflare on the admin dashboard. Cloudflare has its apps which you can install for your website. It will disable these apps on the admin dashboard.
In this blog, I have discussed the Cloudflare apps and how those can help your website with additional features. - Cache Level: Bypass all the cache for the admin dashboard. You do not need any cache for the dashboard.
- Always Online: You already know what it does, it serves the cached version if the host is unreachable or down for some reason. You do not need this for your admin dashboard.
- Security Level: Set it to High for high security for the admin dashboard. To know more about the Security Level click here. I recommend to set it to High.
- Browser Cache TTL: Set it for 30 minutes for the admin dashboard. You do need to cache the static contents for the admin dashboard for a longer period.
- Browser Integrity Check: It is highly recommended. Turn this on. What it does, when Cloudflare detects some bad behavior from the browser(especially from the spammers), it automatically puts some challenges to go further. You read more about this here.
After settings, all this click on the Save and Deploy button.
Page Rule for the Preview Pages
Now create another page rule for the preview pages. When you preview a page/post before publishing it opens with a preview URL. So you also need to set a rule for the URL. The rule for this is the same as the admin dashboard. You just need to type the preview URL as on the image below, all other settings are the same.
After set up, all the settings click on the Save and Deploy button.
Now, one important thing is you need to order the page rules for better optimization and performance. Order the page rule settings as the image below.

You need to put the rule for the admin to the first after that put the rule for the preview pages and at last put the rule that is for from end. Move the rule up and down by clicking on the arrows before the rule numbers.
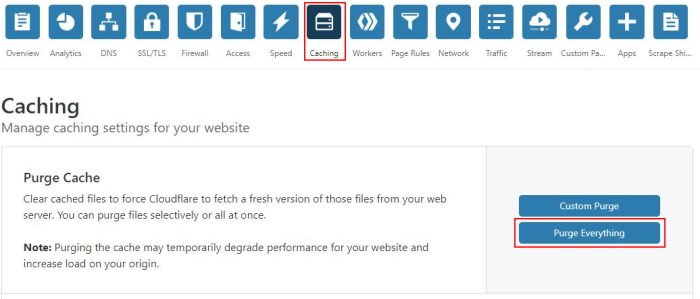
You need to purge the cache to apply all the settings and to collect a new cache. To purge(clear) the cache click on the Cache icon and at the top menu and click on the Purge Cache.
Cloudflare API Connection to WordPress Plugin
You can connect the Cloudflare CDN to the WordPress Cache plugin. If you are using Cache plugins like LiteSpeed Cache, WP Fastest Cache, WP Super Cache or any other Cache plugin you can do this by integrating the Cloudflare API to the WordPress dashboard.
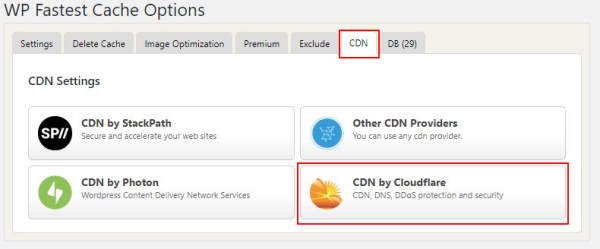
It will ask you for the email ID associated with Cloudflare and the Cloudflare API key. To get the Cloudflare API, go to your Cloudflare account and click on Get your API token.
Under the API Keys click on the View button for the Global API Key.
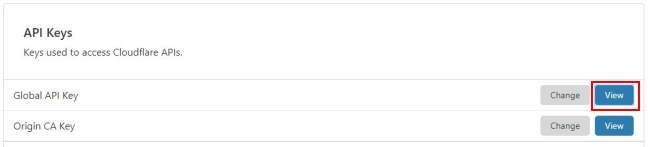
It will ask for the account password, after the password you can see the API key. Copy the API key and go to the CDN option on the Cache plugin on the WordPress dashboard. Paste the key there.
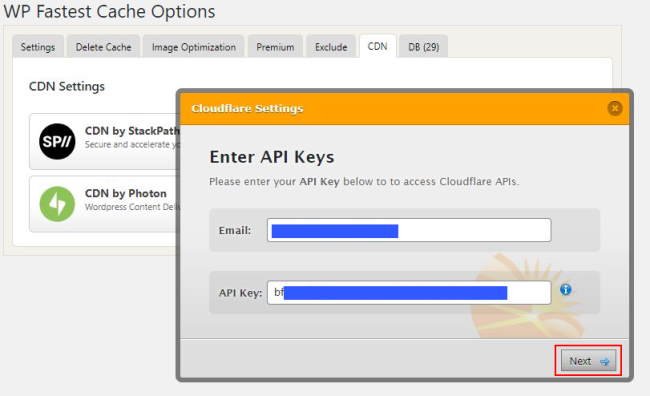
After setting all the recommended settings the Cache Plugin can now manage the Cloudflare cache for the website.
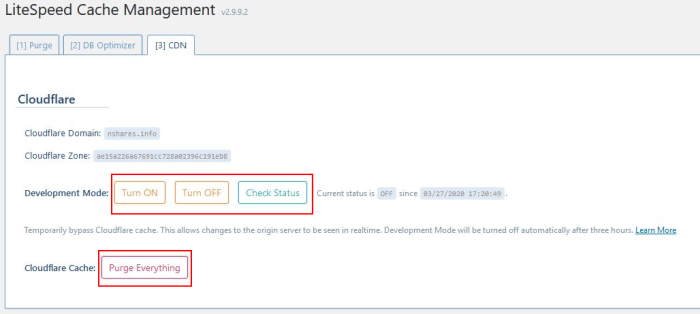
For the other plugins, you may see the settings options slightly different. Like I am using The LiteSpeed Cache plugin on a website, there I can purge the Cloudflare cache manually when I want to. And also you can turn on Development mode when you are customizing the website.
If your hosting is LiteSpeed Server then you can use the LiteSpeed Cache plugin to get the best performance. For the other hosting you can use this plugin but, the optimization you will not work as on the LiteSpeed Server.
If you are planning to get a new hosting or want to change the current hosting you can choose Hostinger for better performance with the LiteSpeed Cache server.
Additional Cloudflare Settings
Now you need to set-up some more settings to optimize more. Go through the following options one by one to get the best performance and security.
Cloudflare Firewall Rules

You can set up manual firewall rules on cloudflare. On the above image one rule is created to block bots to access the website’s sensitive pages like login pages, etc.
You can set up up to 5 rules for a free Cloudflare account.
AMP Real URL
If you are already using AMP(Accelerated Mobile Pages) for the website it may be helpful. It will show the real URL instead of the Google cached URL.

To enable this go to the Cache menu and under this go to Optimization. Under this, you will find the AMP Real URL, turn this on.
You can browse the other settings on Cloudflare by going through the menus. But before enabling or disabling any function read about it on the Cloudflare forum or on any other forums.
I have covered the basic and necessary functions that you need to optimize the website.
Cloudflare Apps
Cloudflare apps can add additional functionalities to the websites. When you are using WordPress you need to install a plugin for some extra functionality you want. You can get the same functionality by the cloudflare apps.
The benefits of using these apps from cloudflare are the apps will be stored on the Cloudflare only so it will reduce the usage of the resource of the server.
Another benefit you will get that these apps will directly serve from the Cloudflare servers so the performance of the app, as well as the performance of the website, will increase.
And one more good news is most of the apps are free.
How to install Cloudflare Apps
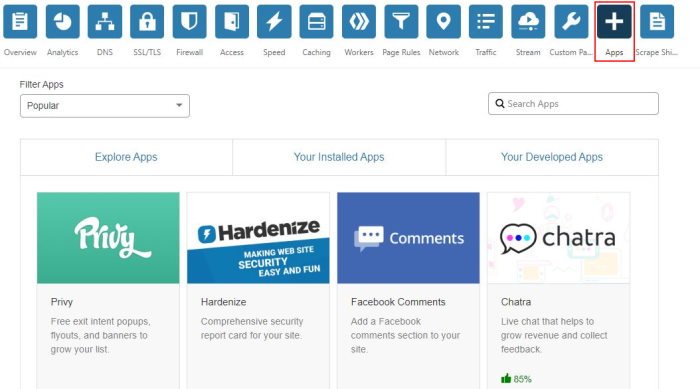
Go to the Apps from the top menu and there you can browse the apps.
Select an app that you want to install on your website. Click on the Preview on your site button. It will preview the function before installing it. You customize the app with a live preview before installing it.

The GIF above showing an example of a preview of a Progress Bar app. This app shows the progress bar while the page is loading.
After the preview and necessary customization click on the Install on all pages to install the app on the website.
Some useful cloudflare apps
- PACE: Shows a progress bar while the website is loading. You can use this as a loader for the website by changing the style.
- Back To Top Button: It will automatically pop a button to the page when the page is scrolled to down. Visitors can go to the top of the page by clicking on the button.
- Social Icons: You can use this app to show the social links of your website.
- Share Buttons: You can use this app to show the share buttons to different platforms.
Explore all the apps provided by Cloudflare from this link.
Final Thoughts
Though Cloudflare is optimized for the best performance and security by this Cloudflare WordPress setup guide. You can use these settings for the non-WordPress sites also.
Sometimes you may see higher loading speed compared to the non-Cloudflare mode. This is because of its high-security methods.
You need to purge the cache when you see that some contents are not updated on the front end.
If you face the website is not loading and showing some Cloudflare error then you can check the status of the cloudflare servers on this URL. If you see it has some issues, then you can turn off the Cloudflare to access the website.
Subscribe with your mail to get more content updates. You can also connect to the Facebook page. Leave your comment below for any suggestions or queries.
Having passed the long way from a database analyst and computer technician to an executive in charge of a large enterprise department's technical direction, he now uses his experience and the almighty power of the Internet to teach, inspire and empower young people and mature to extend their technological skills.
- Convert Multiple Images to Text using OCR using Python - November 10, 2023
- How to use WhatsApp on Android Tablet (Simultaneously) - September 1, 2022
- How to Cancel PayPal Subscriptions (recurring payments through PayPal)? - June 28, 2022


